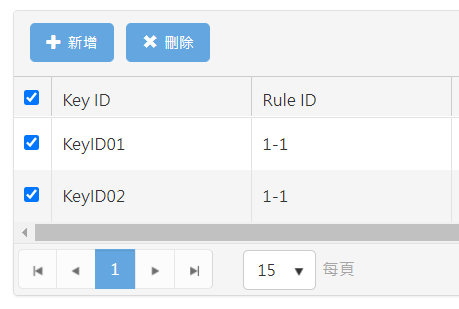
此文章主要是在撰寫Web網頁時,使用Java Script及Kendo UI的學習心得。
子表 - Kendo Grid 設定子表 1 2 3 $("#fm_id" ).kendoGrid ({ dataSource : dataSource, columns : columns});
監聽 Edit Event 1 2 3 4 var subGrid = $('#fm_id' ).data ("kendoGrid" );subGrid.bind ('edit' , function (e ) { console .log ("Edit : " + e.model .id ); });
監聽 Remove Event 1 2 3 4 var subGrid = $('#fm_id' ).data ("kendoGrid" );subGrid.bind ('remove' , function (e ) { console .log ("Remove : " + e.model .id ); });
監聽 CheckBox Event Step 1: 子表設定好checkbox
1 2 3 4 5 var columns=[{ headerTemplate : '<input type="checkbox" class="selectAll" />' ,width : '30px' ,template : '<input type="checkbox" class="select" value="${id}" />' }]
Step 2: 設定子表
1 2 3 $("#fm_id" ).kendoGrid ({ dataSource : dataSource, columns : columns});
Step 3: 監聽變化
1 2 3 4 5 subGrid.element .on ("click" , ".select" , selectRow); function selectRow ( var checked = this .checked }
監聽變化 1 2 $("#fm_id" ).data ("formGrid" ).totalColumn = function (
重新載入 1 2 3 4 subGrid.dataSource .read (); subGrid.refresh ();
內頁編輯 文件參考
內頁編輯-資料移除問題 1 2 3 4 5 6 7 8 9 10 $("#fm_id" ).kendoGrid ({ dataSource : xxx, edit : function (e ) { }, cancel : function (e ) { $('#fm_id' ).data ('kendoGrid' ).dataSource .cancelChanges (); }});
批次更改內容 1 2 3 4 5 6 7 8 9 10 11 $('#fm_id' ).data ("kendoGrid" ).bind ("dataBound" , dataBound_sub); function dataBound_sub (e ) { var grid = $("#fm_id" ).data ("formGrid" ); if (grid.dataSource ._total > 0 ) { $("#fm_id tbody tr" ).each (function (index ) { $(this ).children (0 ).eq (欄位_INDEX).html ('<p style="color:red">' +TEST + '</p>' ) }); } }
欄位順序調整 1 2 var grid = $("#fm_id" ).data ("kendoGrid" );grid.reorderColumn (1 , grid.columns [3 ]);
欄位隱藏 1 2 3 var grid = $("#fm_id" ).data ("kendoGrid" );grid.hideColumn ("欄位名稱" );
更改欄位標題 1 2 3 4 5 $("#fm_id thead th" ).each (function (index ) { if (this .dataset .title != "序號" ) { this .innerHTML = this .innerHTML .replace (this .dataset .title , this .dataset .title + "<br>" + "(系統帶入,無須填寫)" ) } });
1 2 3 4 5 $(".k-grid-add" ).hide (); var grid = $("#grid" ).data ("kendoGrid" ) $("#grid" ).find (".k-grid-toolbar .k-grid-add" ).hide ();
編輯按鈕隱藏/顯示 我們在子表中設計了兩個按鈕,根據某些情境要隱藏/顯示此兩個按鈕,該如何實作?
初始化Kendo Grid時,監聽編輯變化
1 2 3 4 5 6 $("#grid" ).kendoGrid ({ dataSource : dataSource, columns : columns, edit : function (cell ) { } });
檢視瀏覽器(Chrome按下F12),查看button的TAG
使用find cell uid和TAG來設置隱藏/顯示。
1 2 3 4 5 6 7 8 9 $("#grid" ).kendoGrid ({ dataSource : dataSource, columns : columns, edit : function (cell ) { var uid = e.model .uid ; $("#grid" ).data ("kendoGrid" ).tbody .find ("tr[data-uid='" + uid + "']" ).find (".k-grid-edit" ).hide (); $("#grid" ).data ("kendoGrid" ).tbody .find ("tr[data-uid='" + uid + "']" ).find (".k-grid-save" ).show (); } });
設定日期控件
Step 1: 設定Columns
1 2 3 4 5 6 7 8 9 10 11 12 13 14 var columns = [{ title : "日期" , field : "date" , width : '20%' , sortable : false , format : "{0:yyyy-MM-dd}" , parseFormats : ["yyyy-MM-dd" ], editor : function (container, options ) { $('<input name="' + options.field + '"/>' ).appendTo (container). kendoDatePicker ({ placeholder : bg.user .dateFormat }); } } ];
Step 2: 設定Datasource - Field
1 2 3 4 5 6 7 8 9 10 11 12 13 14 15 16 17 var dataSource = new kendo.data .DataSource ({ schema : { model : { id : "id" , fields : { id : { type : "string" , editable : true }, date : { type : "date" , editable : true } } } } });
Step 3: 設定Kendo Grid
1 2 3 4 $("#grid" ).kendoGrid ({ dataSource : dataSource, columns : columns, });
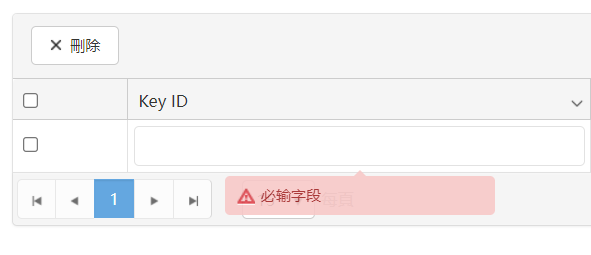
設定必填欄位 Method 1: 在DataSource中設定 設定DataSource - validation: { required: true }
1 2 3 4 5 6 7 8 9 10 11 12 13 14 15 var dataSource = new kendo.data .DataSource ({ schema : { model : { id : "id" , fields : { id : { type : "string" , editable : false }, keyID : { type : "string" , editable : true , validation : { required : true } }, } } } });
Method 2: 在Columns中設定 設定Columns
1 2 3 4 5 6 7 8 9 10 11 12 13 14 15 16 var columns = [ { title : opts.locale .keyID , field : "keyID" , width : '30%' , template : '#= bg.nullDisplay(keyID) #' editor : function (container, options ) { var input = $('<input type="text" class="k-input k-textbox" name="' + options.field + '" data-bind="value:' + options.field + '" required="required" />' ); input.appendTo (container); var tooltipElement = $('<span class="k-invalid-msg" data-for="' + options.field + '"></span>' ); tooltipElement.appendTo (container); } } ]
設定好DataSource or Columns後,設定Kendo Grid時,不要設定 scrollable
1 2 3 4 5 $("#grid" ).kendoGrid ({ dataSource : dataSource, columns : columns, });
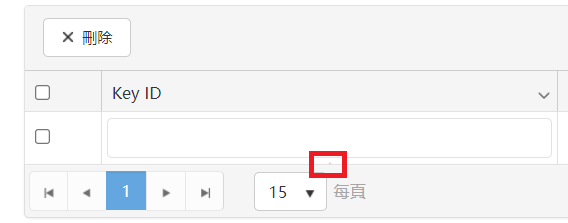
如果設定為scrollable: true會看不到提示文字 tooltip
設定數值顯示格式 設計子表時,一般會在columns設定template顯示格式。
ex:
1 2 3 4 5 6 7 var columns = [{ title : opts.locale .keyID , field : "keyID" , width : '160px' , editor : keyIDDropDownEditor, template : '#= bg.nullDisplay(keyID) #' }]
但是如果要設定數字格式的話,無法使用#,因為template的#是特殊判斷文字。
所以必須改用function的方式設定。
1 2 3 4 5 6 7 8 var columns = [{ title : opts.locale .minMoney , field : "minMoney" , width : '140px' , template : function (dataItem ) { return bg.nullDisplay (kendo.toString (kendo.parseFloat (dataItem.minMoney ), "##,#" )); } }]
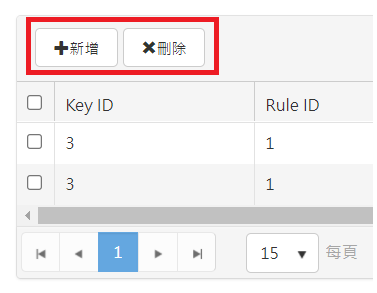
基本Toolbar的配置只有text, name, 和 iconClass可以設定。
1 2 3 4 5 6 7 8 9 10 11 12 13 14 $("#grid" ).kendoGrid ({ dataSource : dataSource, columns : columns, toolbar : [ { name : "create" , text : "新增" , iconClass : "glyphicon glyphicon-plus" }, { name : "delete" , text : "刪除" , iconClass : "glyphicon glyphicon-remove" }] });
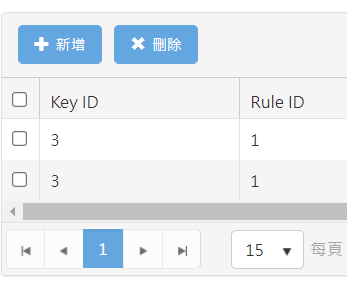
如果要調動位置,更改class的話,必須使用template來做客製化。
1 2 3 4 5 6 7 8 9 10 11 12 $("#grid" ).kendoGrid ({ dataSource : dataSource, columns : columns, toolbar : [ { name : "create" , template : '<a class="btn btn-success k-grid-add" href="\\#" style="display: inline-block;"><span class="glyphicon glyphicon-plus"></span>新增</a>' }, { name : "delete" , template : '<a class="btn btn-success" onclick="bg.nec.RulesList.remove(this);return false;" style="margin-left:10px"><span class="glyphicon glyphicon-remove"></span>刪除</a>' }] });
如果要將Toolbar中的button移到右邊的話,可以使用 style=”float:right;” 的方式。
1 2 3 4 5 6 7 8 9 10 11 12 $("#grid" ).kendoGrid ({ dataSource : dataSource, columns : columns, toolbar : [ { name : "create" , template : '<a class="btn btn-success k-grid-add" href="\\#" style="display: inline-block;"><span class="glyphicon glyphicon-plus"></span>新增</a>' }, { name : "delete" , template : '<a class="btn btn-success" onclick="bg.nec.RulesList.remove(this);return false;" style="float:right;"><span class="glyphicon glyphicon-remove"></span>刪除</a>' }] });
凍結欄位 子表可以設定scrollable: true,使得子表可以拖拉欄位
若我們想凍結某些欄位時,可以在設定columns時,設定凍結欄位locked: true。
1 2 3 4 5 6 7 8 9 10 11 12 var columns = [{ headerTemplate : '<input type="checkbox" class="selectAll" />' , width : '30px' , locked : true , template : '<input type="checkbox" class="select" value="${id}" />' }, { title : opts.locale .keyID , field : "keyID" , width : '160px' , editor : keyIDDropDownEditor, template : '#= bg.nullDisplay(keyID) #' }]
不過使用凍結欄位可能會遇到以下問題
問題: 高度被擋住 使用凍結欄位,可能會在畫面計算時,欄位高度計算錯誤,導致某些內容被遮住。
解決方式: 當資料更動時,重新計算欄位高度。
設定resizable: true和dataBound計算欄位高度。
1 2 3 4 5 6 7 $("#grid" ).kendoGrid ({ dataSource : dataSource, columns : columns, resizable : true , editable : true , scrollable : true , dataBound : onDataBound});
1 2 3 4 5 6 7 8 9 10 11 12 13 14 15 16 17 18 19 function onDataBound (e ) { resizeGrid (e.sender ); } function resizeGrid (grid ) { setTimeout (function ( var lockedContent = grid.wrapper .children (".k-grid-content-locked" ) var content = grid.wrapper .children (".k-grid-content" ); grid.wrapper .height ("" ); lockedContent.height ("" ); content.height ("" ); grid.wrapper .height (grid.wrapper .height ()); grid.resize (); }); }
問題: 原先設定的欄位無作用 原先在Header設定一個checkbox,當勾選時將所有的checkbox都勾選。
1 2 3 4 5 6 var grid = $("#grid" ).data ("kendoGrid" );grid.thead .find ("th>.selectAll" ).on ("click" , function ( var checkbox = $(this ); grid.table .find ("tr>td>input[type='checkbox'].select" ).attr ("checked" , checkbox.is (":checked" )).trigger ("change" ); });
將此Header凍結欄位後,發現都失效了。
1 2 3 4 5 6 var grid = $("#grid" ).data ("kendoGrid" );grid.lockedHeader .find ("th>.selectAll" ).on ("click" , function ( var checkbox = $(this ); grid.lockedTable .find ("tr>td>input[type='checkbox'].select" ).attr ("checked" , checkbox.is (":checked" )).trigger ("change" ); });


