由於最近需要去研究人臉辨識的實作方式,雖然目前網路上提供很多SDK,不過大多數都是要付費使用,畢竟一個Machine Learning的資料庫也需要維護,所以大部分不會有免費使用的SDK。
在網路上搜尋後,找到了一個輕量化的開源資料庫 - TensorFlow Lite
本篇先以辨識圖像的例子來解說,往後再介紹人臉辨識的方式。
參考文章
Step 1: 下載TensorFlow模型
使用MobileNet_v1_1.0_224的模型 下載點
解壓縮之後可以找到 mobilenet_v1_1.0_224.tflite這個檔案
Step 2: 下載模型Label
上述的模型共有1001個分類,不過壓縮檔內沒有包含分類好的標籤,
已分類好的標籤可由此下載 下載點
Step 3: 引用TensorFlow Lite
在build.gradle的dependencies中加入libraries
build.gradle1
2
3
4
5
| dependencies {
...
implementation 'com.github.bumptech.glide:glide:4.3.1'
implementation 'org.tensorflow:tensorflow-lite:0.0.0-nightly'
}
|
然後在android的項目中加入以下代碼,主要是避免壓縮tensor lite的模型
build.gradle1
2
3
4
5
6
| android {
...
aaptOptions {
noCompress "tflite"
}
}
|
Step 4: 添加模型
在main目錄下創建assets,將剛剛.tflite和label .txt檔案放到此處。
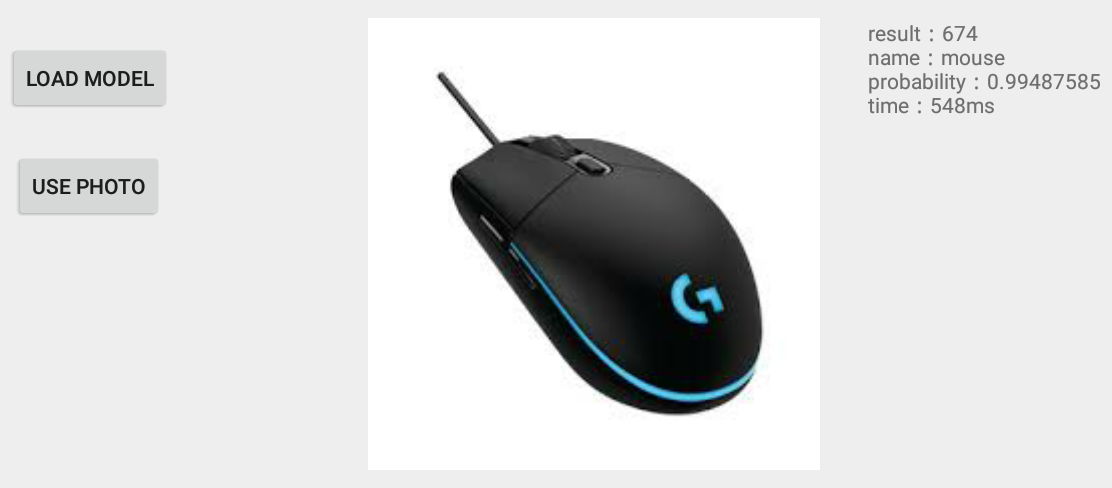
在畫面中使用兩個按鈕: 引用模型和分析圖片
點擊引用模型的代碼如下
loadModeFile : 把模型文件讀取成ByteBuffer,並交給Interpreter初始化。
load_mode : 取得Interpreter後,使用這個物件來分析圖像,並設置使用的Thread 數量 (tflite.setNumThreads)
MainActivity.java1
2
3
4
5
6
7
8
9
10
11
12
13
14
15
16
17
18
19
20
21
22
23
24
25
26
27
28
29
30
31
32
33
34
35
36
37
| private final String MODEL_NAME = "mobilenet_v1_1.0_224";
private Interpreter tflite = null;
@Override
public void onClick(View v) {
switch(v.getId()) {
case R.id.load_model:
load_model(MODEL_NAME);
break;
...
}
}
private void load_model(String model) {
try {
tflite = new Interpreter(loadModelFile(model));
Toast.makeText(MainActivity.this, model + " model load success", Toast.LENGTH_SHORT).show();
Log.d(TAG, model + " model load success");
tflite.setNumThreads(4);
load_result = true;
} catch (IOException e) {
Toast.makeText(MainActivity.this, model + " model load fail", Toast.LENGTH_SHORT).show();
Log.d(TAG, model + " model load fail");
load_result = false;
e.printStackTrace();
}
}
private ByteBuffer loadModelFile(String model) throws IOException {
AssetFileDescriptor fileDescriptor = getApplicationContext().getAssets().openFd(model + ".tflite");
FileInputStream inputStream = new FileInputStream(fileDescriptor.getFileDescriptor());
FileChannel fileChannel = inputStream.getChannel();
long startOffset = fileDescriptor.getStartOffset();
long declaredLength = fileDescriptor.getDeclaredLength();
return fileChannel.map(FileChannel.MapMode.READ_ONLY, startOffset, declaredLength);
}
|
Step 5: 添加Label
在程式開始時,先讀入Label文件
MainActivity.java1
2
3
4
5
6
7
8
9
10
11
12
13
14
15
16
17
18
19
20
| @Override
protected void onCreate(Bundle savedInstanceState) {
super.onCreate(savedInstanceState);
...
readCacheLabelFromLocalFile();
}
private void readCacheLabelFromLocalFile() {
try {
AssetManager assetManager = getApplicationContext().getAssets();
BufferedReader reader = new BufferedReader(new InputStreamReader(assetManager.open(LABEL_NAME + ".txt")));
String readLine = null;
while ((readLine = reader.readLine()) != null) {
resultLabel.add(readLine);
}
reader.close();
} catch (Exception e) {
Log.e("labelCache", "error " + e);
}
}
|
Step 6: 分析圖片
predict_image :先取得圖片後,對圖片進行壓縮,之後把圖片轉成ByteBuffer格式後,再調用Interpreter.run()進行分析。
get_max_result : 取得分析之後,機率最高的Label
MainActivity.java1
2
3
4
5
6
7
8
9
10
11
12
13
14
15
16
17
18
19
20
21
22
23
24
25
26
27
28
29
30
31
32
33
34
35
36
37
38
39
40
41
42
43
44
45
46
47
48
49
50
51
52
53
54
55
56
57
58
59
60
61
62
63
64
65
66
67
68
69
70
71
72
73
74
75
76
77
78
79
80
81
82
83
84
85
86
87
88
89
90
91
92
93
94
95
96
97
98
99
100
101
| private List<String> resultLabel = new ArrayList<>();
private ImageView mImage;
private int[] ddims = {1, 3, 224, 224};
private TextView mResult;
@Override
public void onClick(View v) {
switch(v.getId()) {
...
case R.id.use_photo:
RequestOptions options = new RequestOptions().skipMemoryCache(true).diskCacheStrategy(DiskCacheStrategy.NONE);
File file = new File("/storage/sdcard1/mouse.jpeg");
Uri photoUri = Uri.fromFile(file);
Glide.with(MainActivity.this).load(photoUri).apply(options).into(mImage);
predict_image(file.getAbsolutePath());
break;
default:
break;
}
}
private void predict_image(String image_path) {
Bitmap bmp = getScaleBitmap(image_path);
ByteBuffer inputData = getScaledMatrix(bmp, ddims);
try {
float[][] labelProbArray = new float[1][1001];
long start = System.currentTimeMillis();
tflite.run(inputData, labelProbArray);
long end = System.currentTimeMillis();
long time = end - start;
float[] results = new float[labelProbArray[0].length];
System.arraycopy(labelProbArray[0], 0, results, 0, labelProbArray[0].length);
int r = get_max_result(results);
String show_text = "result:" + r + "\nname:" + resultLabel.get(r) + "\nprobability:" + results[r] + "\ntime:" + time + "ms";
mResult.setText(show_text);
} catch (Exception e) {
e.printStackTrace();
}
}
private Bitmap getScaleBitmap(String filePath) {
BitmapFactory.Options opt = new BitmapFactory.Options();
opt.inJustDecodeBounds = true;
BitmapFactory.decodeFile(filePath, opt);
int bmpWidth = opt.outWidth;
int bmpHeight = opt.outHeight;
int maxSize = 500;
opt.inSampleSize = 1;
while (true) {
if (bmpWidth / opt.inSampleSize < maxSize || bmpHeight / opt.inSampleSize < maxSize) {
break;
}
opt.inSampleSize *= 2;
}
opt.inJustDecodeBounds = false;
return BitmapFactory.decodeFile(filePath, opt);
}
private ByteBuffer getScaledMatrix(Bitmap bitmap, int[] ddims) {
ByteBuffer imgData = ByteBuffer.allocateDirect(ddims[0] * ddims[1] * ddims[2] * ddims[3] * 4);
imgData.order(ByteOrder.nativeOrder());
int[] pixels = new int[ddims[2] * ddims[3]];
Bitmap bm = Bitmap.createScaledBitmap(bitmap, ddims[2], ddims[3], false);
bm.getPixels(pixels, 0, bm.getWidth(), 0, 0, ddims[2], ddims[3]);
int pixel = 0;
for (int i = 0; i < ddims[2]; ++i) {
for (int j = 0; j < ddims[3]; ++j) {
final int val = pixels[pixel++];
imgData.putFloat(((((val >> 16) & 0xFF) - 128f) / 128f));
imgData.putFloat(((((val >> 8) & 0xFF) - 128f) / 128f));
imgData.putFloat((((val & 0xFF) - 128f) / 128f));
}
}
if (bm.isRecycled()) {
bm.recycle();
}
return imgData;
}
private int get_max_result(float[] result) {
float probability = result[0];
int r = 0;
for (int i = 0; i < result.length; i++) {
if (probability < result[i]) {
probability = result[i];
r = i;
}
}
return r;
}
|
執行結果

