針對Android 單元測試中, 若要執行與Android API 相關的測試時, 我們可用 Instrumented Test 的方式來測試.
(請參閱 Android App Test 基本概念)
這類型的測試會啟動instrumentation Test Runner,可以模擬 Android 事件
Step 1: 建立取得當前網路狀況的函數 (被測試函數)
NetworkUtils.java1
2
3
4
5
6
7
8
9
10
11
12
13
14
15
| public class NetworkUtils {
public static boolean isNetworkConnected(Context context) {
ConnectivityManager cm = (ConnectivityManager) context.getSystemService(Context
.CONNECTIVITY_SERVICE);
NetworkInfo nInfo = cm.getActiveNetworkInfo();
if (null != nInfo
&& nInfo.isConnected()
&& nInfo.isAvailable()) {
return true;
} else {
return false;
}
}
}
|
Step 2: 建立測試檔
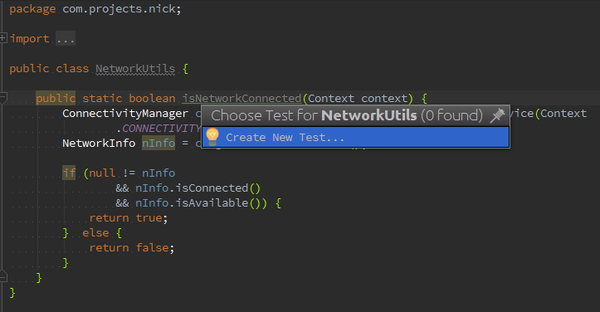
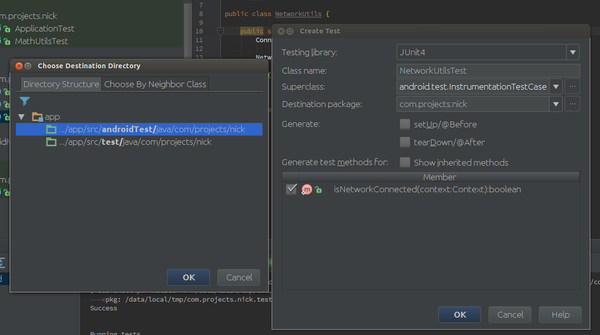
利用 Ctrl + Shift + T 建立 NetworkUtilsTest.java

並繼承 InstrumentationTestCase

位置儲存於 /src/androidTest/java/ package_path /
Step 3: 確認測試檔
確認測試檔是否位於 AndroidTest 中
之前有發生過錯誤
Class not found: “XXX.XXX.XXX” Empty test suite.
原因是測試檔不是屬於AndroidTest (使用Clean Build後重新新增測試檔也沒用), 後來將原先的測試檔從Junit 中移除才解決
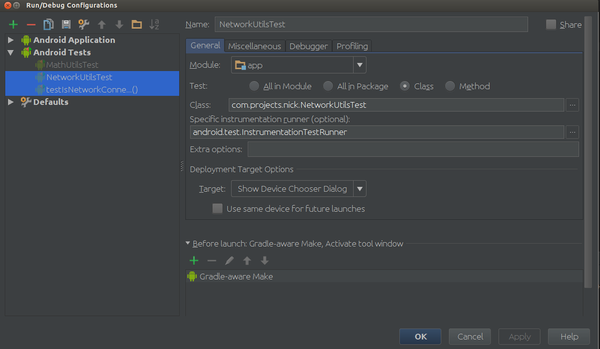
Run -> Edit Configuations

若發現測試檔案不屬於AndroidTest, 先刪除相關測試後, 再重新執行Step 2.
Step 4: 確認 test compiler
打開build.gradle 確認 dependencies 中有增加testCompile
1
2
3
4
5
6
| dependencies {
compile fileTree(include: ['*.jar'], dir: 'libs')
testCompile 'junit:junit:4.12'
testCompile 'org.mockito:mockito-core:1.9.5'
compile 'com.android.support:appcompat-v7:23.1.1'
}
|
Step 5: 增加權限
打開AndroidManifest.xml 增加 permission
AndroidManifest.xml1
| <uses-permission android:name="android.permission.RUN_INSTRUMENTATION" />
|
並宣告要測試的package
AndroidManifest.xml1
2
3
| <instrumentation
android:name="android.test.InstrumentationTestRunner"
android:targetPackage="com.projects.nick" />
|
在application 中增加 runner library
AndroidManifest.xml1
| <uses-library android:name="android.test.runner" />
|
完整寫法
AndroidManifest.xml1
2
3
4
5
6
7
8
9
10
11
12
13
14
15
16
17
18
19
20
21
22
23
24
25
26
27
28
29
30
31
| <?xml version="1.0" encoding="utf-8"?>
<manifest xmlns:android="http://schemas.android.com/apk/res/android"
package="com.projects.nick">
<uses-permission android:name="android.permission.ACCESS_NETWORK_STATE"/>
<uses-permission android:name="android.permission.WRITE_EXTERNAL_STORAGE"/>
<uses-permission android:name="android.permission.RUN_INSTRUMENTATION" />
<instrumentation
        android:name="android.test.InstrumentationTestRunner"
        android:targetPackage="com.projects.nick" />
<application
android:allowBackup="true"
android:icon="@mipmap/ic_launcher"
android:label="@string/app_name"
android:supportsRtl="true"
android:theme="@style/AppTheme">
<uses-library android:name="android.test.runner" />
<activity android:name=".MainActivity">
<intent-filter>
<action android:name="android.intent.action.MAIN"/>
<category android:name="android.intent.category.LAUNCHER"/>
</intent-filter>
</activity>
</application>
</manifest>
|
Step 5: Run Test
Project列表中, 在測試檔點擊右鍵, 執行


