Text To Speech (TTS) 文字語音,也就是將使用者輸入的文字轉化為語音。百度TTS 是一個免費的文字語音SDK,本篇將以百度TTS SDK 來達成文字語音的功能。
Step 1: 創建應用
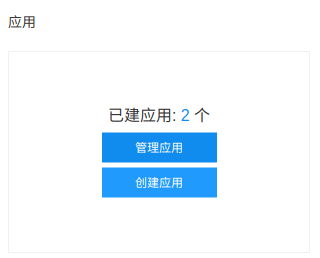
首先必須要註冊百度雲 帳號,註冊好之後,點擊管理控制台來創建應用。

選擇語音技術

再選擇創建應用

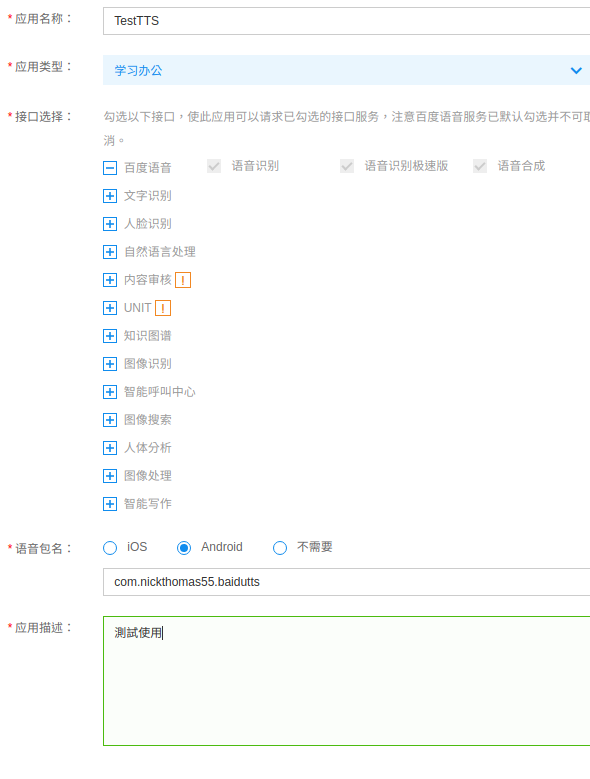
填入相關資訊,
記得要填對package name

Step 2: 下載SDK和library
點選左邊Menu Bar的SDK下載,再選取語音合成,下載Android版本的SDK。
在project/src/main 新增資料夾jniLibs。
將下載後壓縮檔解壓縮後,將Baidu-TTS-Android-2.3.5.20180713_6101c2a/app/src/main/jniLibs/armeabi資料夾複製到剛剛新增的jniLibs資料夾中。
再將Baidu-TTS-Android-2.3.5.20180713_6101c2a/app/libs/com.baidu.tts_2.3.2.jar複製到project/libs中
Step 3: 引用jar檔
在build.gradle的dependencies中增加compile jar檔
build.gradle1
2
3
4
| dependencies {
...
compile files('libs/com.baidu.tts_2.3.2.jar')
}
|
Step 4: 初始化TTS
取得SpeechSynthesizer實例
1
2
3
4
| private SpeechSynthesizer mSpeechSynthesizer;
mSpeechSynthesizer = SpeechSynthesizer.getInstance();
mSpeechSynthesizer.setContext(this);
|
設置TTS Listener
1
2
3
4
5
6
7
8
9
10
11
12
13
14
15
16
17
18
19
20
21
22
23
24
25
26
27
28
| public class MainActivity extends AppCompatActivity implements SpeechSynthesizerListener {
private void initTTS() {
...
mSpeechSynthesizer.setSpeechSynthesizerListener(this);
}
@Override
public void onSynthesizeStart(String s) { }
@Override
public void onSynthesizeDataArrived(String s, byte[] bytes, int i) { }
@Override
public void onSynthesizeFinish(String s) { }
@Override
public void onSpeechStart(String s) { }
@Override
public void onSpeechProgressChanged(String s, int i) { }
@Override
public void onSpeechFinish(String s) { }
@Override
public void onError(String s, SpeechError speechError) { }
}
|
Step 5: 設置AppId, AppKey 和 AppSecretKey
在百度雲創建應用程式後,會有AppId, AppKey 和 AppSecretKey

1
2
| int result = mSpeechSynthesizer.setAppId(appId);
result = mSpeechSynthesizer.setApiKey(appKey, secretKey);
|
Step 6: 驗證並下載授權文件
TtsMode.ONLINE : 純在線模式,自動下載授權文件,每次啟用時可能需要更新授權文件
TtsMode.MIX : 離線與在線模式
1
2
3
4
5
6
7
8
9
10
| private boolean checkAuth() {
AuthInfo authInfo = mSpeechSynthesizer.auth(ttsMode);
if (!authInfo.isSuccess()) {
String errorMsg = authInfo.getTtsError().getDetailMessage();
return false;
} else {
Log.i(TAG, "checkAuth success!");
return true;
}
}
|
Step 7: 導入TTS 模型
複製 Baidu-TTS-Android-2.3.5.20180713_6101c2a/app/src/main/assets資料夾到project/src/main中
在程式開始前,將檔案複製到SD Card中
1
2
3
4
5
6
7
8
9
10
11
12
13
14
15
16
17
18
19
20
21
22
23
24
25
26
27
28
29
30
31
32
33
34
35
36
37
38
39
40
41
42
43
44
45
46
47
48
49
50
51
52
53
54
55
56
57
58
59
60
61
62
63
64
65
66
67
68
69
| private String MODEL_FILENAME ;
private String TEXT_FILENAME ;
private static final String SPEECH_FEMALE_MODEL_NAME = "bd_etts_common_speech_f7_mand_eng_high_am-mix_v3.0.0_20170512.dat";
private static final String TEXT_MODEL_NAME = "bd_etts_text.dat";
@Override
protected void onResume() {
super.onResume();
copyModelFileToSD();
initTTS();
}
private void copyModelFileToSD() {
String folder = MainActivity.this.getFilesDir().getAbsolutePath();
MODEL_FILENAME = folder + "/" + TEXT_MODEL_NAME;
TEXT_FILENAME = folder + "/" + SPEECH_FEMALE_MODEL_NAME;
InputStream is = null;
FileOutputStream fos = null;
try {
Context context = MainActivity.this.getApplicationContext();
File textFile = new File(TEXT_FILENAME);
File modelFile = new File(MODEL_FILENAME);
if (!textFile.exists()) {
textFile.createNewFile();
is = context.getAssets().open(TEXT_MODEL_NAME);
fos = new FileOutputStream(textFile);
copyFile(is, fos);
} else {
}
if (!modelFile.exists()) {
modelFile.createNewFile();
is = context.getAssets().open(SPEECH_FEMALE_MODEL_NAME);
fos = new FileOutputStream(modelFile);
copyFile(is, fos);
} else {
}
} catch (IOException e) {
Log.e(TAG, "Error: " + e.toString());
} finally {
closeObject(is);
closeObject(fos);
}
}
private void copyFile(InputStream is, FileOutputStream fos) throws IOException {
byte[] buffer = new byte[2048];
int byteCount = 0;
while((byteCount=is.read(buffer))!=-1) {
fos.write(buffer, 0, byteCount);
}
fos.flush();
}
private void closeObject(Closeable obj) {
try {
if (null != obj) {
obj.close();
}
} catch (IOException e) {
Log.e(TAG, "Error: " + e.toString());
}
}
|
在checkAuth成功後,設置模型參數
1
2
3
4
5
6
7
8
9
10
11
12
13
14
15
| private void setupParam() {
mSpeechSynthesizer.setParam(SpeechSynthesizer.PARAM_TTS_TEXT_MODEL_FILE, TEXT_FILENAME);
mSpeechSynthesizer.setParam(SpeechSynthesizer.PARAM_TTS_SPEECH_MODEL_FILE, MODEL_FILENAME);
mSpeechSynthesizer.setParam(SpeechSynthesizer.PARAM_SPEAKER, "0");
mSpeechSynthesizer.setParam(SpeechSynthesizer.PARAM_VOLUME, "9");
mSpeechSynthesizer.setParam(SpeechSynthesizer.PARAM_SPEED, "4");
mSpeechSynthesizer.setParam(SpeechSynthesizer.PARAM_PITCH, "4");
mSpeechSynthesizer.setParam(SpeechSynthesizer.PARAM_MIX_MODE, SpeechSynthesizer.MIX_MODE_DEFAULT);
}
|
MIX_MODE_DEFAULT: 有wifi時,使用在線模式,無wifi時使用離線模式。在線狀態下,請求超過6秒自動轉離線。
MIX_MODE_HIGH_SPEED_SYNTHESIZE_WIFI: 與MIX_MODE_DEFAULT相同,但請求超過1.2秒自動轉離線。
MIX_MODE_HIGH_SPEED_NETWORK: 可使用3G/4G or Wifi, 但請求超過1.2秒自動轉離線。
完整設定TTS模型流程如下
1
2
3
4
5
6
7
8
9
10
11
12
13
14
15
16
17
18
19
20
| private void initTTS() {
mSpeechSynthesizer = SpeechSynthesizer.getInstance();
mSpeechSynthesizer.setContext(this);
mSpeechSynthesizer.setSpeechSynthesizerListener(this);
int result = mSpeechSynthesizer.setAppId(appId);
result = mSpeechSynthesizer.setApiKey(appKey, secretKey);
if (!checkAuth()) {
return;
}
setupParam();
result = mSpeechSynthesizer.loadModel(TEXT_FILENAME, MODEL_FILENAME);
result = mSpeechSynthesizer.initTts(TtsMode.MIX);
if (result != 0) {
Log.e(TAG, "init failed");
} else {
Log.e(TAG, "init success");
}
}
|
Step 8: 讀出文字
如果需要馬上讀出語音的話,使用speak api。只需要先合成可使用synthesize。
1
2
| String text = "測試百度TTS";
mSpeechSynthesizer.speak(text);
|


